Category: software

  • Accessing remote libvirt on a non-standard SSH port via virt-manager

    Scenario: you are using a remote host as a virtualization host with libvirt and you want to manage it via ”Virtual machine manager” (virt-manager) over SSH.

    But SSH is listening on a non-standard port, and virt-manager does not offer you to connect to a remote libvirt instance on a non-standard port.

    Fear not, the option to connect to your libvirt command is just this command away:

    virt-manager -c 'qemu+ssh://root@:/system?socket=/var/run/libvirt/libvirt-sock'
    

    (make sure to have passwordless login to the remote host already setup, for example with SSH keys).

    Plus note: you can install virt-manager even on macOS (obviously only remote support) with homebrew-virt-manager

  • Replacing Xmarks cross-browser sync service with Eversync

    I have a huge collection of bookmarks I collected over the years and I always have had the need to sync my bookmarks between my browsers of choice; Xmarks has always been one of the browser extensions I used for this need.

    Unfortunately, Xmarks is shutting down on May 1, 2018. I looked for some alternatives, like:

    I finally found Eversync: just signup (take a look at their pricing) and install their extension on all your browsers and keep your bookmarks in sync. The concept is the same as in Xmarks. They also offer a mobile app.

  • Automatically update your Docker base images with watchtower

    I’m an avid user of Docker containers, using base images pulled from the public registry DockedHub. As you may know, Docker containers are based on Docked base images, e.g. I run postgres containers that are based on Postgres base image.

    It occurs that base images could get updated by their respective author (in our case Postgres team) and pushed to DockerHub. But your container does not benefit from this update unless:

    • you pull the new image
    • stop and delete your container
    • spawn another container using the new base image (of course I’m considering a very simple setup without clusters and Kubernetes).

    What if I tell you that there is a way to automate the process for you?

    Enter watchtower: a Docker container (inception!) to automatically restart your Docker container to use the most recent published base image; of course, watchtower checks regularly for any updates of the base image and pulls the new version if necessary.

    Configuration is none existent as you just have to follow watchtower’s instructions and launch the container: after that, you are all set!

    Anybody said drawbacks? Yes, there might be drawbacks. What if your container is restarted during a transaction? What if the new base image is unstable?

    These are all factors that you should take into account if you want watchtower to update your containers or not. In my case, for some applications that I run in containers, I value the comfort of having watchtower handle the updates enormously compared to the problems it may generate (so far: none).

  • Incubo PuntoCom Shop: NON acquistate su questo sito!

    Recentemente ho acquistato un iPhone 8 sul sito PuntoCom Shop (linkato in nofollow).
    Dopo una settimana dall’acquisto, il telefono ha presentato un difetto con la fotocamera, scattando foto con un alone rosa; il difetto è conosciuto da Apple, tant’è che non sono l’unico ad essere stato vittima di questo difetto hardware Apple.

    Recandomi in un Apple Store mi è stata offerta la possibilità di poter riparare il telefono in garanzia; visto che il telefono era stato attivato pochi giorni prima, il Genius di Apple mi ha anche suggerito la possibilità di effettuare il recesso e ottenere un telefono nuovo in cambio, ma tale possibilità era gestita solo nel caso in cui io avessi acquistato il telefono su Apple Store.

    Sulla base del suggerimento, rifiuto la riparazione e chiedo a PuntoCom Shop di restituire il telefono e ottenerne uno nuovo, o in alternativa di effettuare il recesso, ma mi è stato risposto che:

    “non è possibile effettuare il recesso di un prodotto malfunzionante”
    “l’attivazione del prodotto Apple fa decadere la possibilità di avvalersi del recesso del bene”

    (come testimoniato dal Genius Apple, quando si acquista su Apple Store siete garantiti come un vero consumatore).

    Se ancora avete dubbi, vi consiglio di leggere la parte sul recesso che è pubblicata su PuntoCom Shop e le loro condizioni di utilizzo.

    E a quanto pare non sono l’unico:

    Il mio consiglio è quindi quella di NON COMPRARE DA QUESTO SITO perché nel caso di qualche problema hardware (imputabile al produttore in questo caso, Apple) NON AVRETE ALCUN DIRITTO DI RECESSO.

  • Docker and containerd on openSUSE: reaching the limit for cgroup (and how to overcome it!)

    I recently encountered a limitation during an experiment I was conducting; after some trial and error, I recognized that the limitation was due to cgroups.

    But let’s start from the beginning. I open sourced docker-salt, a small pet project I had in mind in order to have a full blown setup for SaltStack: a master with an army of minions. Now for the fun part: what if I really start a hundred of minions on a server that has 16GB of RAM ready to be stressed with SaltStack?

    yankee:~ # docker run -d --hostname saltmaster --name saltmaster -v `pwd`/srv/salt:/srv/salt -p 8000:8000 -ti mbologna/saltstack-master
    yankee:~ # for i in {1..100}; do docker run -d --hostname saltminion$i --name saltminion$i --link saltmaster:salt mbologna/saltstack-minion ; done                                                                                        
    

    When reaching around the ~50th container created, Docker cannot start containers anymore:

    [...]
    a9e72a3b9452d1ff23628ab431e1b3127a0cbf218bfa179d602230f676e3740
    docker: Error response from daemon: containerd: container not started.
    a827de31439a2937ceebd8769e742038c395c9543e548071f36058789b9b144c
    docker: Error response from daemon: invalid header field value "oci runtime error: container_linux.go:247: starting container process caused \"process_linux.go:237: starting init process command caused \\\"fork/exec /proc/self/exe: resource temporarily unavailable\\\"\"\n".
    [...]
    

    By looking at the logs, we can see a more verbose message:

    yankee containerd[2072]: time="2017-04-20T22:59:10.608383236+02:00" level=error msg="containerd: start container" error="oci runtime error: container_linux.go:247: starting container process caused \"process_linux.go:243: running exec setns process for init caused \\\"exit status 6\\\"\"\n" id=aa642284b64dc97a519f6d33004d4a1468c13b9ef52bb05338fc09396631567f
    

    The problem here is that we reached the limit of the cgroup imposed for containerd, so we cannot fork any new process to spawn a new container.

    The solution is pretty easy: open /usr/lib/systemd/system/containerd.service and add the directive TasksMax=infinity to overcome the problem:

    [Service]
    [...]
    TasksMax=infinity
    [...]
    

    Issue a systemctl daemon-reload followed by systemctl restart containerd and you are good to go. Now the army of 100 minions can be started (sky is the limit!)

  • OpenSUSE Leap 42.2: this is how I work (my setup)

    Motivation

    I switched my distribution of choice to OpenSUSE. There are a lot of motivations behind this choice:

    1. I wanted an enterprise-grade quality of software in terms of stability, package choice, and supportability
    2. Growing interest in software non-distribution specific and/or customized, e.g. Gnome
    3. Dogfooding

    After nearly one year of usage, I can say that I am mostly satisfied with the setup I built.

    In this post I will cover a step-by-step advanced installation of OpenSUSE: we are going to mimic the exact setup I have on my machine. I want to share the setup first of all for myself, keeping track on why I did some decisions back then, and secondly for you, fellow readers: you can follow my example and setup a successful OpenSUSE box.

    Leap or Tumbleweed?

    OpenSUSE comes in two variants:

    • Leap: represent the stable branch. It’s a fixed schedule release, which means that a release comes out from time to time. You pick a release, and install it: every update is based on the release version.

    • Tumbleweed: represent the bleeding-edge branch, and it’s a rolling release (which means that you install a snapshot of that branch and apply updates from there on).

    On my machine, I always want stability over the bleeding-edge version of the latest package, so I choose Leap. Leap has version number 42: as the time of writing, two releases have been made available to the public:

    • 42.1 (released 2015-11-04)
    • 42.2 (released 2016-11-16)

    Let’s download 42.2 (the most recent one), burn it to a USB key (or a DVD, if your computer still has it) and follow the instructions.

    This post will not cover every choice. I will just point out what I changed from the default. If nothing is mentioned here, it means I followed the default.

    Installation choices

    Offline install

    Install the distribution in offline mode: if you use your laptop in clamshell mode, disconnect everything (even network): I want to install the distribution as it has been released (potential updates will be applied after the installation).
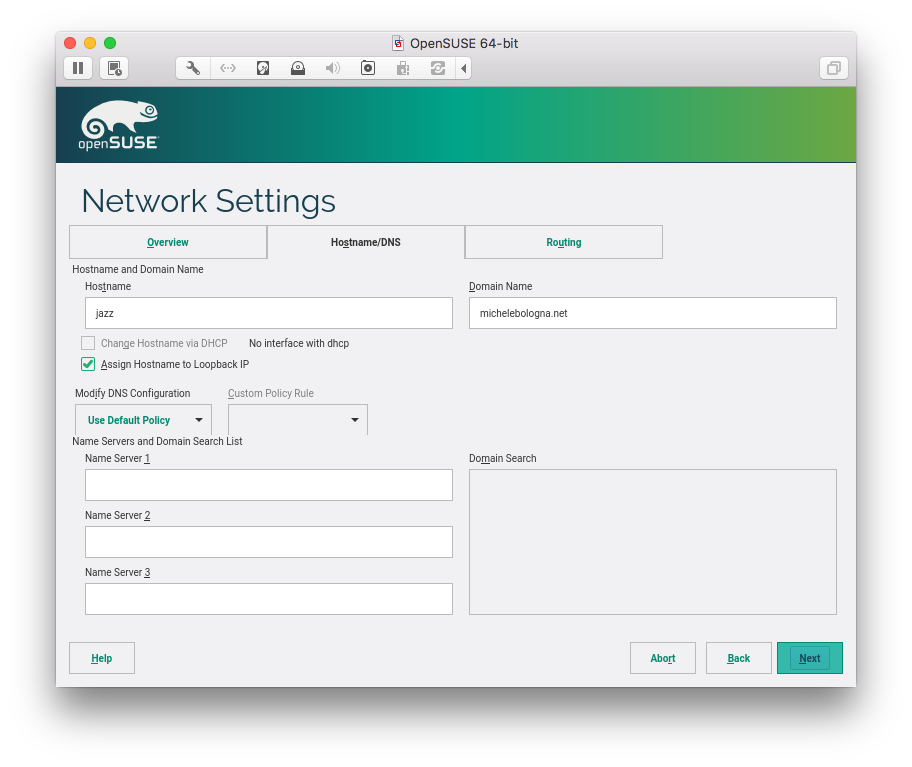
    Network Settings

    I enforce a static hostname and domain name. Feel free to name your machine and domain name, and check “Assign Hostname to Loopback IP”.
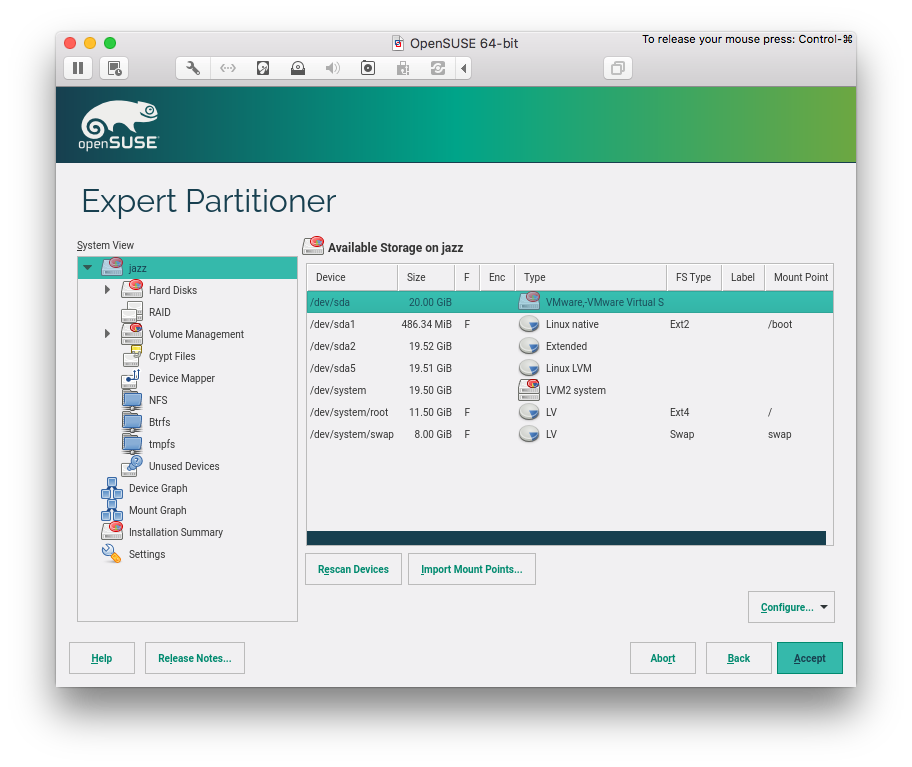
    hostname selection

    Partition layout

    Base partitioning: /boot and LVM

    For maximum compatibility, I want my hard drive partitioned with:

    • a primary partition that will contain /boot
    • an extended partition with 0x8E (Linux LVM) with a system Volume Group (VG) and at least two Logical Volumes (LV)

    partitioning hard drive

    /boot

    /boot should be an ext2 partition type and separated from the LVM partition (in case I need to take out my hard-drive and insert in another computer, this ensures compatibility with legacy BIOSes and older computers). The partition should be sized (roughly) at ~500 MB – I choose 487 MiB (1 Megabyte = 0.953674 Mebibyte).

    Linux LVM

    I use LVM everywhere for easiness of partition shrinking, growing, moving, etc. There is no motivation for not using it. If your BIOS support hard drive encryption, enable it there. If not, use encrypted LVM.

    LVM should have a VG named system that must have two LVs:

    • root that will contain all your data (I normally do not need a separated /home partition)
    • swap that will act as swap (this will be useful when you use suspend).

    For a system with more than one hard drive, I also create another VG (e.g. storage), or add them to system. Unless you use XFS, there is no need to do a final decision here (more on this in the following paragraph).

    root LV file-system

    I am a great fan of XFS. Over the many advantages of it, there is one major disadvantage: an XFS partition cannot be shrunk.

    So, think carefully here: if you think you are going to shrink your partition in the future for every reason, I would advise against XFS. Otherwise, go for XFS.

    In my experience, the aforementioned is non-existent for servers, although it can happen for desktop and laptop machines. For my main system I will not choose XFS, thus I will go with ext4.

    swap LV size

    A long time ago we reserved twice the size of RAM to the swap partition. Nowadays most computers have >= 8 GB of RAM, so I will just choose the same amount of RAM size for my swap partition.
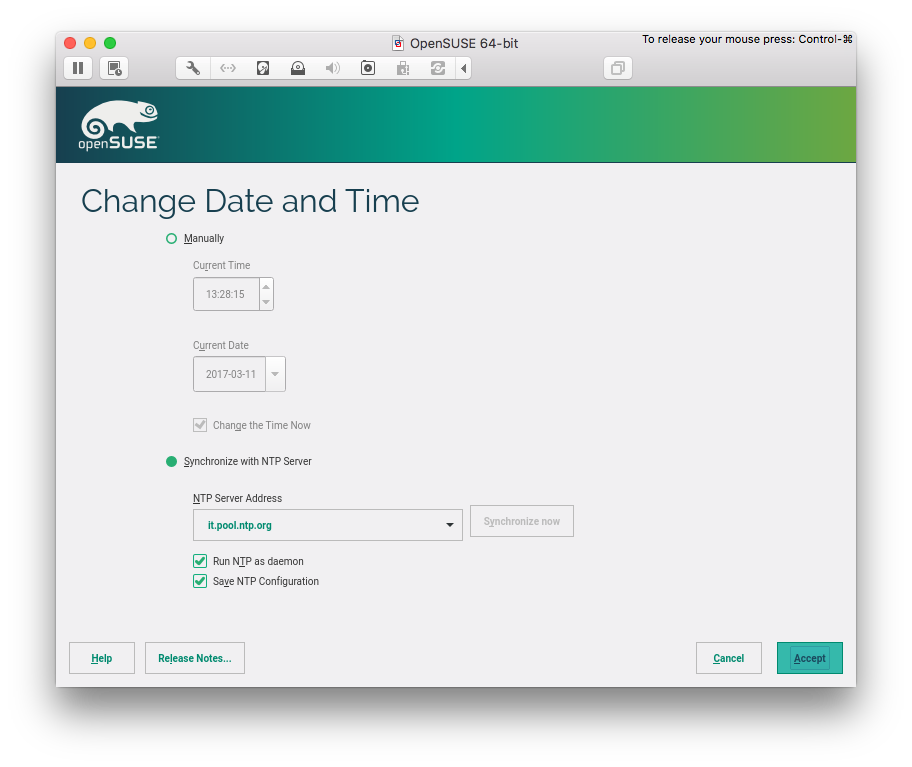
    Clock and Time Zone

    I synchronize my system with an NTP server, and I chose to run NTP as a daemon for my system, saving the configuration.

    clock and timezone

    Desktop selection

    I usually go with Gnome or XFCE (it is a personal preference here so feel free to choose another one). During our customization (in the next post) we are going to also install i3, another great window manager that I like a lot.
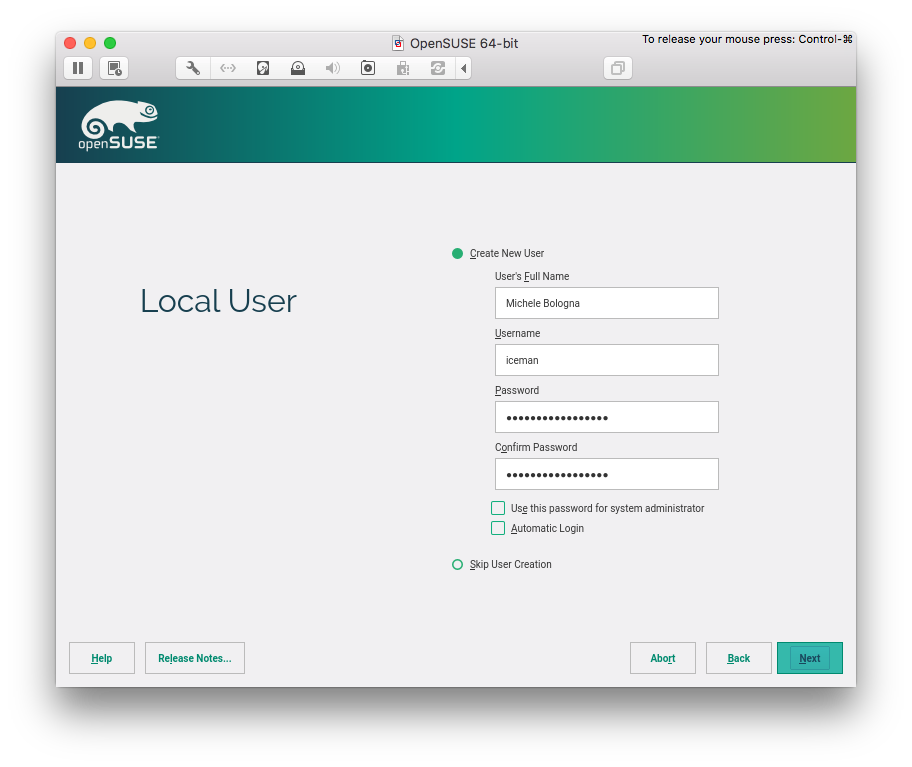
    Local User

    My local user should be distinguished from the system administrator (root) account, so I deselected “Use this password for system administrator”. Of course, this will mean that root account will have another (different!) password.

    And I also do not want automatic login.

    local user creation

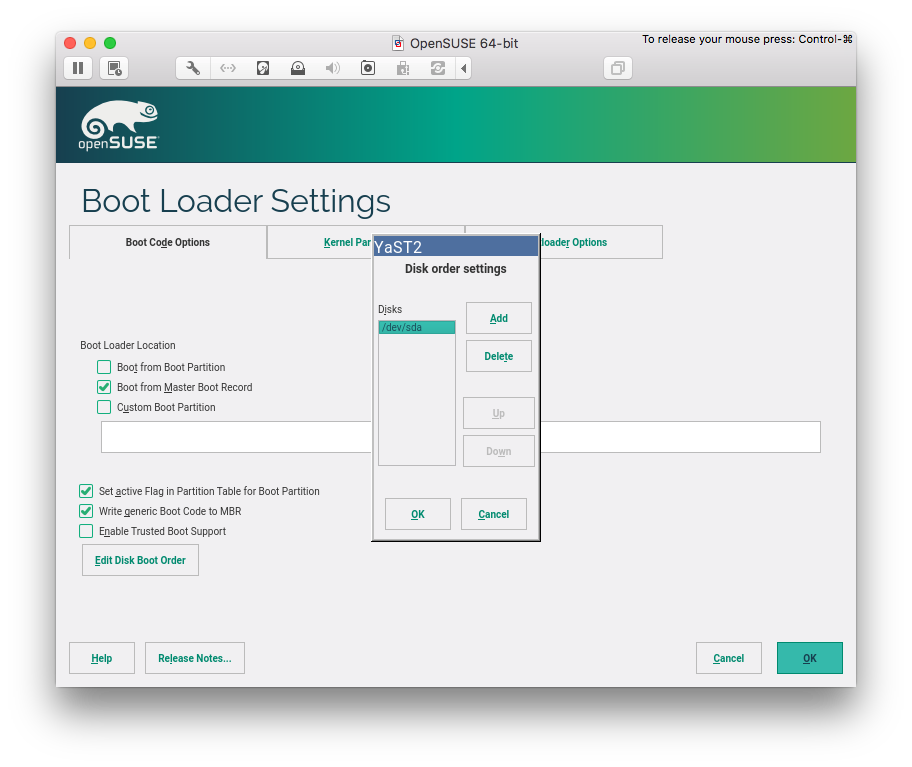
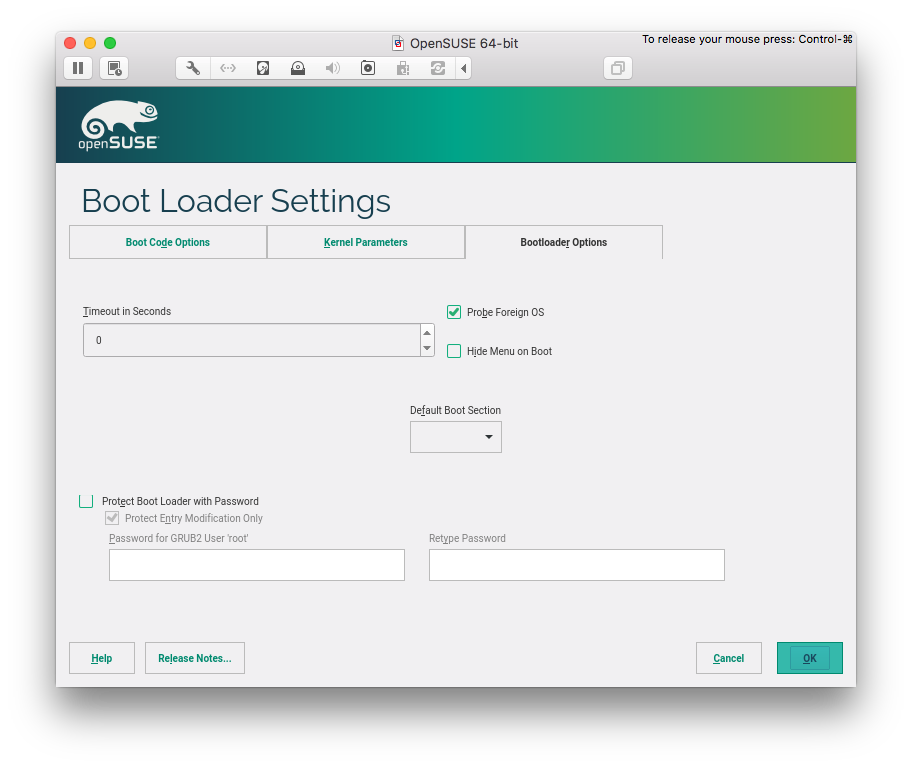
    Boot Loader Settings

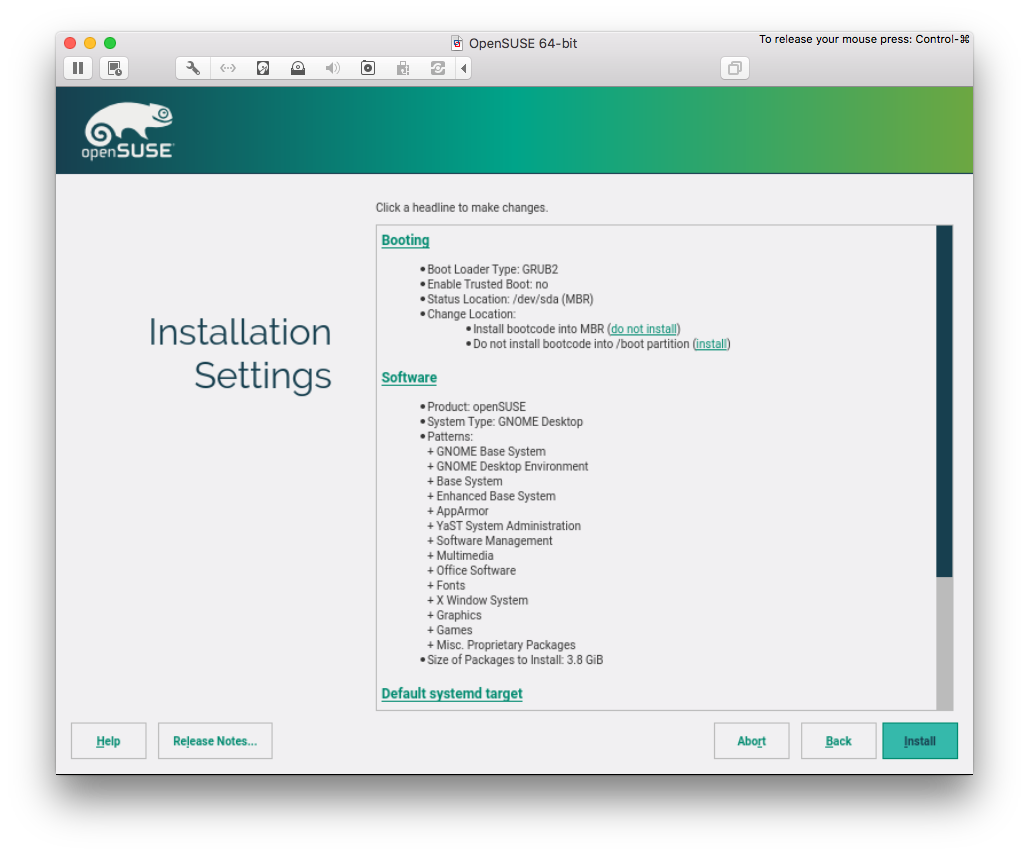
    GRUB2 should be installed into Master Boot Record (MBR) and not into /boot. If you are installing via USB key, make sure to remove it from “Boot order”. Optional: set timeout to 0 in “Bootloader Options” (so you do not have to wait for booting).

    grub configuration disk order

    grub configuration timeout

    Software

    Just go with the default selection, or, if you cannot wait, go ahead and select packages. There is no rush, though: we will install packages that I need in the next post, during the customization phase.
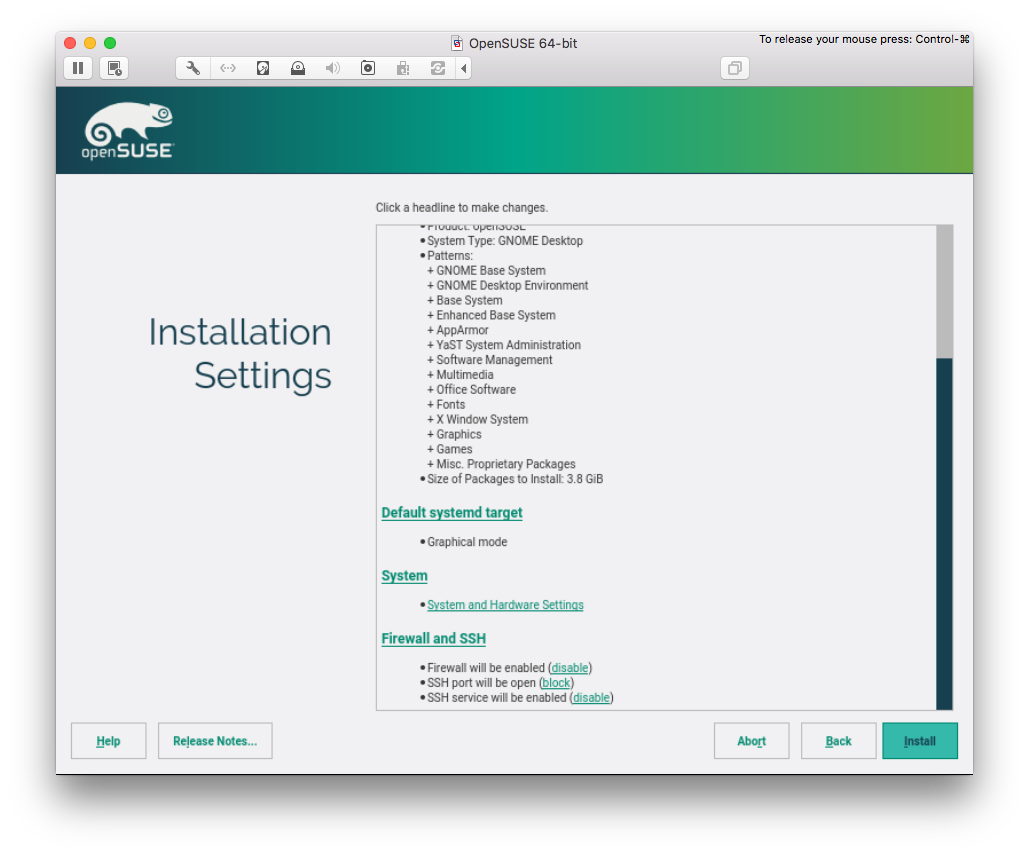
    Firewall and SSH

    I suggest to unblock SSH port and enable SSH service. WARNING: make sure to config your ssh daemon properly in order to allow only key-based logins.

    summary of installation 1

    summary of installation 2

    Conclusion

    After the installation, we have a plain Gnome environment ready to rock. In the following post, we are going to customize every bit of it, installing all the packages that I think fundamental. Stay tuned!

    opensuse 42.2 desktop

  • Checkstyle and DetailAST

    If you are running Checkstyle (for checking Java style) and you are stuck with this error:

    checkstyle:
    [checkstyle] Running Checkstyle 6.11.2 on 2324 files
    [checkstyle] Can't find/access AST Node typecom.puppycrawl.tools.checkstyle.api.DetailAST
    

    which is a cryptic error with no whatsoever Google result on how to fix it, stand back: I have the solution!

    You probably have these packages installed in your system:

    % rpm -qa | grep -i antlr
    ant-antlr-1.9.4-9.2.noarch
    antlr-java-2.7.7-103.38.noarch
    antlr-2.7.7-103.38.x86_64
    

    To fix your problem, just remove ant-antlr package from your system.

  • git: deleting remote tracked branches

    Since I’m always DuckDuckGo-ing for these information, I’ll set a note here for future reference and for all of you, fellow readers.

    Situation: one (or more) remote-tracked git branches got deleted (either locally or remote). You are in either one of the two cases following:

    • you have deleted the local branch and you want to delete that branch in the remote too. What you want is:

    git push <remote> :<deleted_branch>

    • someone (you or other allowed members on the remote) has deleted a remote branch. To delete all stale remote-tracked branches for a given remote:

    git remote prune <remote>

  • OpenVPN with multiple configurations (TCP/UDP) on the same host (with systemd)

    OpenVPN with multiple configurations (TCP/UDP) on the same host (with systemd)

    As much more people are getting worried about their online privacy (including me), I started to use a server as a VPN termination (with OpenVPN) when I need to access the Internet via non-secure wired or wireless networks (e.g., hotel wireless network, airport Wi-Fi, etc.).

    Some overzealous network admins, though, try to lock down the network usage to users, for understandable reasons: fair usage, fear of abuse, and so on. To name some of such limitations:

    • non-encrypted traffic sniffing (who trusts HTTP nowadays for sensitive data? Surprisingly, there is still someone who deploys HTTP for that!);
    • traffic shaping (especially downstream);
    • destination ports limited to 80/tcp and 443/tcp;
    • dns locking and consequently leaking (yes, I’m paranoid).

    To overcome this limitations, I decided to use multiple configurations for OpenVPN, I wanted some flexibility on my side, offering multiple configurations of a VPN termination: one for TCP and one for UDP. I want to share some implementation notes that might save some time for whoever wants the same setup:

    • TCP subnets must be separated from UDP subnets (I use a /24 for each one; take a look at IANA Reserved addresses and do your math);
    • You can use the same tun adapter for both servers at the same time.

    Now for the tricky part:

    • Most OpenVPN implementations (depends on your distro) require that you supply a configuration file. In our case, we prepare two config files (one for TCP and one for UDP) under /etc/openvpn
    /etc/openvpn # ls *.conf
    tcp-server.conf  udp-server.conf
    • systemd must be informed on which configuration it must start whenever openvpn is launched via its service unit. To accomplish that, open /etc/default/openvpn and specify the VPN configurations that must be started:
    # Start only these VPNs automatically via init script.
    # Allowed values are "all", "none" or space separated list of
    # names of the VPNs. If empty, "all" is assumed.
    # The VPN name refers to the VPN configutation file name.
    # i.e. "home" would be /etc/openvpn/home.conf
    #
    # If you're running systemd, changing this variable will
    # require running "systemctl daemon-reload" followed by
    # a restart of the openvpn service (if you removed entries
    # you may have to stop those manually)
    #
    AUTOSTART="tcp-server udp-server"
    • Finally, we need to reload systemd as instructed above:
    # systemctl daemon-reload
    • Now, if you restart OpenVPN with systemctl restart openvpn and you check your logs, you should see that both your VPN are started:
      11:38:33 vpn02.lin.michelebologna.net systemd[1]: Starting OpenVPN connection to tcp-server...
      11:38:33 vpn02.lin.michelebologna.net systemd[1]: Starting OpenVPN connection to udp-server...
      11:38:33 vpn02.lin.michelebologna.net systemd[1]: Started OpenVPN connection to tcp-server.
      11:38:33 vpn02.lin.michelebologna.net systemd[1]: Started OpenVPN connection to udp-server.

      and you can also check that OpenVPN is listening with netstat:

      # netstat -plunt | grep -i openvpn
      tcp 0 0 0.0.0.0:1194 0.0.0.0:* LISTEN 1635/openvpn
      udp 0 0 0.0.0.0:1194 0.0.0.0:* 1644/openvpn

  • Spotify puzzles: round two

    Some months ago, I began challenging myself with Spotify puzzles: at that time I was dealing with an easy problem; now, the difficulty has increased. The round two consists in the typical “Selection problem“: given an array of values, find the max (or min) k values. I decided to still use Python and to use its heapq module to store values in a binary max-heap data structure, and then remove exactly k values from the top of the heap. This approach will guarantee that the total time complexity of the algorithm will be O(n log k).

    The heapq module implements a min-heap data structure (as happens in Java). In order to use a max-heap, I specified a custom comparator for the Song class I wrote (remember: Python3 deprecates __cmp__ method, so I resort to implement __lt__ and __eq__ methods to specify a custom comparison algorithm):

    # If two songs have the same quality, give precedence to the one
    # appearing first on the album (presumably there was a reason for the
    # producers to put that song before the other).
    def __lt__(self, other):
        if self.quality == other.quality:
            return self.index < other.index
        else:
            # heapq is a min-heap, so a song is lt than another if it has
            # a greater quality (inverted!)
            return self.quality > other.quality
    
    def __eq__(self, other):
        return self.quality == other.quality and \
               self.index == other.index
    

    As always, I used py.test to automatically test my solution against test-cases.

    pytest

    In the end, the honorable (automated) judge confirms the solution:

    spotify_zipfsong

    Code has been published on GitHub.