Tag: ubuntu

  • Automatic (or unattended) upgrades in openSUSE, CentOS and Fedora, Debian and Ubuntu

    Each one of us is a system administrator: for at least your workstation (or notebook) you can decide when and how to administrate it. In the special case in which you are being elected to administer servers too, the matter becomes thorny: what is the workflow in terms of patching, time of reaction to security issues and, in general, when and how to install updates?

    Some distributions offer the concept of automatic (or unattended) upgrades: install automatically a subset (or all) the available updates via the package manager. This particular subset can be specified by the system administrator, a notable example would be the subset of security updates.

    The approach is, of course, debatable: should you use it for a critical server? What happens if the upgrade goes south? Would this approach scale?

    The answer is, nevertheless, debatable: it depends. You are not required to use automatic updates, but installing security patches automatically might make sense in some non-mission-critical situations. You can read an opinionated list of reasons to use automatic updates, as well as an equally opinionated list of reasons NOT to use automatic updates.

    In this post, I am going to present the three approaches for automatic updates offered in:

    • openSUSE
    • CentOS and Fedora
    • Debian and Ubuntu

    and how I setup them for my own “very special, do not try this at home” situation, which means that servers always install only security updates automatically.

    openSUSE

    openSUSE can schedule automatic updates via Automatic Online Update.

    Take a look at the documentation: everything is already well documented, you just need to the package with:

    # zypper install yast2-online-update-configuration

    and then, to configure it:

    # yast2 online_update_configuration

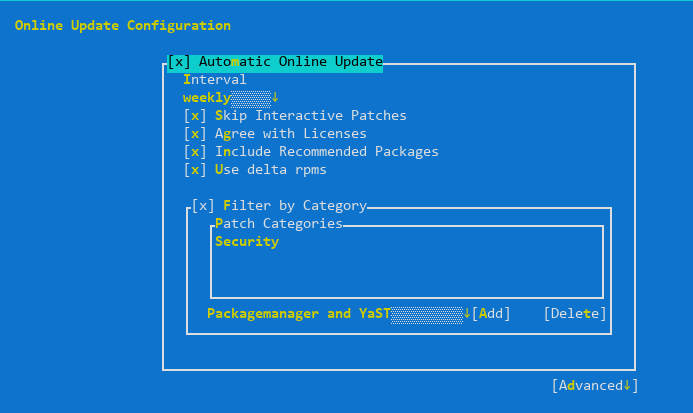
    The servers must weekly check and install only security updates automatically (category “Security”), except the ones declared as “Interactive”. From the documentation:

    Sometimes patches may require the attention of the administrator, for example when restarting critical services. For example, this might be an update for Docker Open Source Engine that requires all containers to be restarted. Before these patches are installed, the user is informed about the consequences and is asked to confirm the installation of the patch. Such patches are called “Interactive Patches”.
    When installing patches automatically, it is assumed that you have accepted the installation of interactive patches. If you rather prefer to review these patches before they get installed, select Skip Interactive Patches. In this case, interactive patches will be skipped during automated patching. Make sure to periodically run a manual online update, to check whether interactive patches are waiting to be installed.

    Skipping interactive patches absolutely makes sense to me, as well as using delta RPMs (to save bandwidth), auto-agreeing with licensing and including recommended packages.

    Update: Richard reminded me that if you are running Leap or Tumbleweed with transactional updates, you can take advantage of automatic transactional updates; rebootmgr will take care of automatically reboot the machine in case any transactional updates were installed.

    CentOS version <= 7

    The package that enables automatic updates is called yum-cron. To install it:

    # yum -y install yum-cron

    The configuration file (/etc/yum/yum-cron.conf) is self-documenting: just open it in an editor and begin tweaking. In my case, to check and install only security updates I just changed the following two lines:

    update_cmd = security
    apply_updates = yes

    Finally, make sure that the corresponding service is enabled:

    # systemctl start yum-cron.service

    Fedora and CentOS version >= 8

    Fedora automatic updates are enabled by installing the dnf-automatic package:

    # dnf install -y dnf-automatic

    As with CentOS, I just changed the configuration file (/etc/dnf/automatic.conf) to install security updates only:

    upgrade_type = security

    After the configuration, start the service:

    # systemctl enable --now dnf-automatic.timer

    Debian and Ubuntu

    Debian and Ubuntu make use of the unattended-upgrades package in order to enable automatic updates. Let’s begin with installing it:

    # apt install unattended-upgrades

    It is configuration time: make sure to enable the update of package lists and perform the upgrade in /etc/apt/apt.conf.d/20auto-upgrades:

    APT::Periodic::Update-Package-Lists "1";
    APT::Periodic::Unattended-Upgrade "1";

    Now enable the repository from which updates can be installed in /etc/apt/apt.conf.d/50unattended-upgrades; in our case, only the security repository:

    Unattended-Upgrade::Origins-Pattern {
            "origin=Debian,codename=${distro_codename},label=Debian-Security";
    };

    Conclusions

    Every distribution offers then its own tweaks (like email notifications when updates are ready and when are installed), package exclusions based on package names, install updates at shutdown time and whatnot: be sure to read the documentation! The examples are just a starting point.

    Happy automatic patching!

  • Packaging software for Debian/Ubuntu: eclipse

    Eclipse is my (Java, Python, Ruby, XML, <insert any other text format here) editor of choice, and it has been for many years. One thing that bothers me is that Eclipse package is outdated in Ubuntu: so, instead of using apt, I should resort to download/unpack/copy/create links to install it. These days are finished, though.

    In fact, I have been introduced to Debian packaging and I contributed to the Debian package of the latest version of the Eclipse IDE (4.5.1). EDIT: Repository has been removed as obsolete.

    This package is really simple (and in fact I used it to learn the packaging process for Debian/Ubuntu). How did I learn it? Recommended reading: How to package for Debian.

    In the following days I will try to publish a PPA with the built package. In the meanwhile, if you want to try to build the package on your own, just: 1. git clone -b eclipse_4.5.1
    2. cd eclipse-ide-java
    3. cd eclipse-ide-java_4.5.1
    4. debuild -i -us -uc -b
    5. cd ..

    Now you have a *.deb package waiting for you to be installed (via dpkg -i): upon installing it will fetch (via wget) the latest version of Eclipse, unpack, copy and create links.

  • Workaround for OpenVPN PAM authentication broken on Ubuntu 15.10

    After updating to Ubuntu 15.10 a box with an OpenVPN termination I am using to browse when I travel and use insecure networks, my VPN tunnel stops working. I am using, in this particular box, an OpenVPN server that relies on PAM plugin for authentication (and 2-step verification).

    Given the fact that I keep all my configuration files under etckeeper, the problem determination began with some git log under my /etc directory, both on server and client. Obviously, no configuration has changed during the upgrade.

    The problem has to be somewhere. I had a look at the logs:

    12:47:46 ovpn-3-rtr.bgo ovpn-server[982]: x.x.8.234:64484 TLS: Initial packet from [AF_INET]x.x.8.234:64484
    12:47:48 ovpn-3-rtr.bgo ovpn-server[982]: x.x.8.234:64484 PLUGIN_CALL: POST /usr/lib/openvpn/openvpn-plugin-auth-pam.so/PLUGIN_AUTH_USER_PASS_VERIFY status=1 
    00:47:48 ovpn-3-rtr.bgo ovpn-server[982]: x.x.8.234:64484 PLUGIN_CALL: plugin function PLUGIN_AUTH_USER_PASS_VERIFY failed with status 1: /usr/lib/openvpn/openvpn-plugin-auth-pam.so
    12:47:48 ovpn-3-rtr.bgo ovpn-server[982]: x.x.8.234:64484 TLS Auth Error: Auth Username/Password verification failed for peer
    12:47:50 ovpn-3-rtr.bgo ovpn-server[982]: x.x.8.234:64484 SENT CONTROL [UNDEF]: 'AUTH_FAILED' (status=1)
    12:47:50 ovpn-3-rtr.bgo ovpn-server[982]: x.x.8.234:64484 Connection reset, restarting [0]
    12:47:50 ovpn-3-rtr.bgo ovpn-server[982]: x.x.8.234:64484 SIGUSR1[soft,connection-reset] received, client-instance restarting
    

    (obviously I was providing the correct username and password).

    Ok, the problem was occurring with PAM plugin. After some research and trial, I came across Bug #1511524 “OpenVPN PAM authentication broken on 15.10 Server” : Bugs : openvpn package : Ubuntu: that is caused by a bug in Ubuntu package of OpenVPN (and specifically in OpenVPN systemd unit file).

    As described in the bug, you have three ways to restore a normal situation. Either:

    • stop the daemon and launch OpenVPN daemon
    • modify /lib/systemd/system/openvpn@.service and add CAP_AUDIT_WRITE to CapabilityBoundingSet property
    • or you can just wait while they ship a package with a correct systemd unit file.

    Don’t forget to systemctl restart openvpn to apply changes and use your VPN:

    13:03:49 ovpn-3-rtr.bgo ovpn-server[5186]: x.x.10.176:61423 PLUGIN_CALL: POST /usr/lib/openvpn/openvpn-plugin-auth-pam.so/PLUGIN_AUTH_USER_PASS_VERIFY status=0 
    13:03:49 ovpn-3-rtr.bgo ovpn-server[5186]: x.x.10.176:61423 TLS: Username/Password authentication succeeded for username 'x'
    
  • HP 6730b and fan at full speed after suspend (Fedora, Ubuntu, openSUSE)

    It seems that with kernels 3.9 onwards there are some issues with fan speed and the 6730b model of HP notebook. I tried with Fedora 22 (my main distribution of choice), openSUSE Tumbleweed and Ubuntu 15.04.

    The problem occurs only when the system is woken up after a sleep/suspend: fans spin at full speed indefinitely, without resort (apart from reboot/shutdown). This is a problem with ACPI. In order to solve this problem, if you’re using Fedora like me, create the file /etc/pm/sleep.d/99fancontrol.sh and fill it with the following:

    case "$1" in
    hibernate|suspend)
    # Stopping is not required.
    ;;
    thaw|resume)
    # In background.
    ls /sys/devices/virtual/thermal/cooling_device*/cur_state | while read A; do echo 1 > $A; echo 0 > $A; done
    ;;
    *) exit $NA
    ;;
    esac

    and of, course, set it executable with chmod +x.

    It basically flips on and off the current state of the cooling devices: with this script you won’t have the noisy fans at full speed on resume.

  • Ubuntu rcS – variabili per modificare il comportamento degli script di boot

    Quando mi trovo a dover fare il setup di un nuovo server, cambio sempre una variabile nel file /etc/default/rcS, ovvero:

    FSCKFIX=yes

    che significa che, in caso di problemi durante il mount dei filesystem al boot, il sistema tenta automaticamente di riparare il file-system, senza interrompere il processo di boot invocando la shell come avviene nel caso default (FCSFIX=no).

    Ubuntu Manpage: rcS – variables that affect the behavior of boot scripts.

  • Evitare riavvii e shutdown remoti su Ubuntu con molly-guard

    Non mi è mai capitato ma potrebbe essere molto utile ai sysadmin più distratti: molly-guard è un pacchetto presente su Ubuntu/Debian che vi permette di evitare un riavvio/shutdown di una macchina remota a cui siete collegati tramite ssh.

    Se, per esempio, tentate di eseguire uno shutdown di una macchina remota a cui siete collegati tramite ssh, molly-guard vi chiede di scrivere per intero l’hostname della macchina che volete riavviare/spegnere.

    Il pacchetto è incluso nei repository ed è molto semplice da installare (basta un apt-get) ed è davvero molto utile: ho provveduto ad installarlo su tutte le macchine che gestisco.

    Per i più curiosi, il nome molly-guard deriva da una “divertente” vicenda.

  • Ubuntu: esportare/importare la lista dei pacchetti installati

    Il punto di forza di Ubuntu, è, tra gli altri, l’utilizzo del package manager di Debian: apt-get (e più in basso nello stack applicativo, di dpkg); alcune volte realizzo un setup (in termini di pacchetti) su una particolare box Ubuntu che vorrei poter esportare su un’altra box. In altre parole, vorrei generare una lista di tutti i pacchetti installati e installarli, automaticamente, su un’altra macchina.

    dpkg offre questa possibilità. Cominciamo con la creazione dell’elenco dei pacchetti installati:

    dpkg --get-selections | grep -v deinstall > installed.txt

    Sulla macchina target, impostiamo la selezione dei pacchetti da installare e installiamo i pacchetti mancanti:

    dpkg --set-selections < installed.txt
    sudo dselect

    Finito!

  • Ubuntu: avviare X senza uno schermo

    Mi è capitato di dover gestire una macchina con Xubuntu (ma questa soluzione si applica a tutte le *Ubuntu) che doveva essere utilizzata da remoto (tramite TeamViewer) e senza uno schermo attaccato.

    Ubuntu, intelligentemente, se non trova uno schermo attaccato allo startup non esegue X. Se X non viene eseguito, tuttavia, Teamviewer non può partire. Come risolvere questo problema?

    Apriamo una shell di root e modifichiamo la configurazione di grub (nel file /etc/default/grub; una volta questo file era era /boot/menu/grub.lst). Modifichiamo l’opzione seguente aggiungendo ‘nomodeset’:

    GRUB_CMDLINE_LINUX_DEFAULT="quiet splash nomodeset"

    salviamo e riavviamo. Risultato raggiunto!

  • Ubuntu: l’aggiornamento a 11.04 corrompe grub. Ecco come risolvere

    Il 28/04, incuriosito dalla nuova release di Ubuntu (11.04) ho subito aggiornato dalla versione 10.10 usando la funzionalità di aggiornamento integrata nel sistema.

    Tuttavia, con mia grande sorpresa, l’aggiornamento corrompe la configurazione di grub, lasciando il sistema in uno stato inavviabile (in particolare, il sistema si arresta sulla schermata di grub prima del boot); e sembra che sia un problema generalizzato! Non tutto è perduto: il problema deriva da un’errata configurazione di grub prodotta dalla procedura di aggiornamento, ma possiamo recuperare il sistema senza dover reinstallare. Per risolvere il problema, procediamo nel seguente modo:

    • Prendete un CD di Ubuntu che abbia la stessa architettura del sistema da recuperare (i386 o amd64; se non sapete quale scegliere, usate i386);
    • Avviate il sistema da LiveCD e aprite un terminale
    • Trovate la partizione contenente la /boot del sistema da recuperare (aiutatevi con fdisk -l) e montatela (ad es. sudo mount /dev/sda1 /media/linux)
    • Montiamo le directory su cui dobbiamo operare:

      sudo mount -B /dev /media/linux/dev
      sudo mount -B /dev/pts /media/linux/dev/pts
      sudo mount -B /proc /media/linux/proc
      sudo mount -B /sys /media/linux/sys

    • E rilocalizziamo il sistema sul sistema target da recuperare: sudo chroot /media/linux
    • A questo punto ripariamo la configurazione di grub:

      grub-install /dev/sda
      update-grub

    • Smontate il filesystem e riavviate: il vostro sistema si avvierà con la versione di Ubuntu appena aggiornata!
  • I componenti certificati per Ubuntu

    Ora, anche per Ubuntu, esistono componenti hardware certificati: li trovate nel catalogo Ubuntu-certified hardware.

    Prima di acquistare dei componenti per un nuovo PC, quindi, verificate sul catalogo. A quando i primi PC con lo sticker “Designed for Ubuntu”?